Part 6 of the Series: Windows 11 on Your Root Server: RDP, Tailscale & VPN for a Free Internet
Activating Windows
To activate Windows, you’ll need a valid Windows 11 Pro license. The best deals are often found on idealo.at.
These inexpensive OEM licenses generally work without issues – still, I recommend that you briefly verify the seller before purchasing.
Look out for the following safety criteria:
- Legal notice (Impressum) available (including company address, contact person, and contact methods)
- Company name and VAT ID are verifiable (no shell companies)
- Read customer reviews (e.g. via Trustpilot or ShopVote)
- Payment options: Reputable sellers offer PayPal or credit card
- No forced download of suspicious activation tools
- License sent via email with a valid product key
Once you’ve received the license key, enter it in Windows as follows:
- Open Start → Settings → System → Activation
- Click on Change product key
- Enter your 25-digit license key and confirm
Windows will now be activated – usually without needing a restart.
Enable DNS over HTTPS (DoH) in Windows
What is DNS over HTTPS?
DNS over HTTPS (DoH) encrypts your DNS requests, so that third parties cannot see which websites you’re visiting. This improves your privacy and prevents DNS manipulation (e.g. redirection).
Step-by-Step Instructions in Windows 11
1. Open Settings
- Click on Start→Settings→Network & Internet
- Select Ethernet
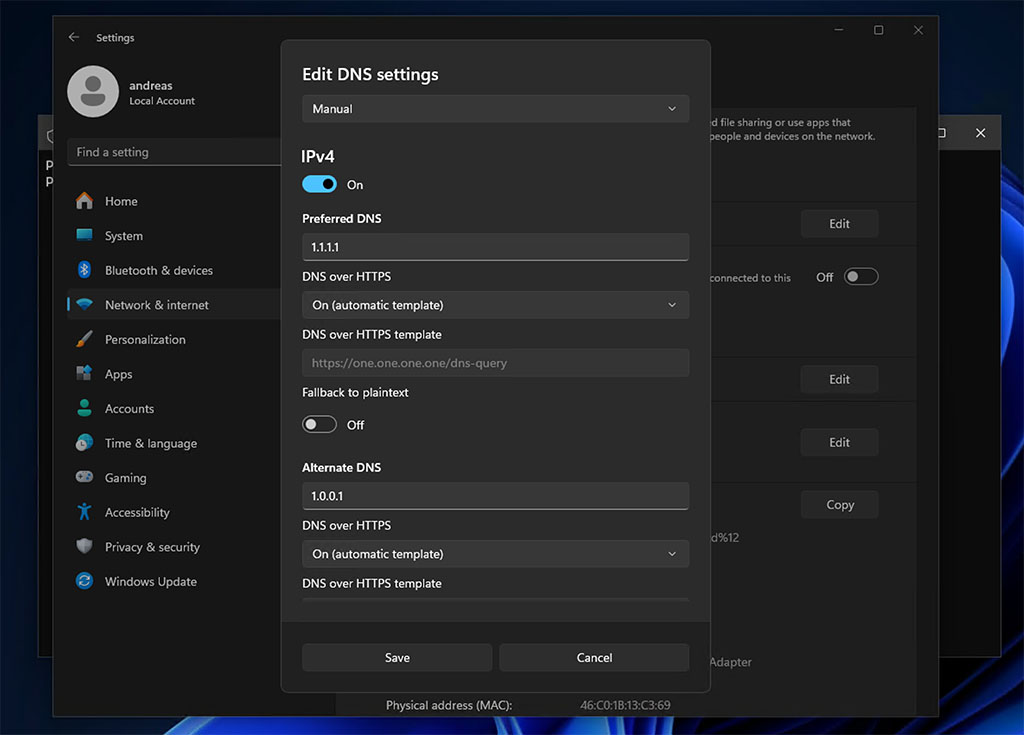
2. Edit DNS Settings
- Click DNS server assignment→Edit
- Select “Manual” and enable IPv4 (also enable IPv6 if needed)
3. Enter Preferred DNS Server
- For example:
- Cloudflare: 1.1.1.1 and 1.0.0.1
- Google: 8.8.8.8 and 8.8.4.4
4. Enable DNS over HTTPS
- You’ll see the option “Use DNS over HTTPS (DoH)” below.
- Set both fields to:
- Preferred: Automatic or On (encrypted preferred)
- Alternate: Same as preferred
5. Save and close
How to Test If DoH Is Active
Visit the following website: https://1.1.1.1/help.
There you’ll see “Using DNS over HTTPS (DoH):” – it should say Yes if everything is configured correctly.
Optimize Windows Privacy Settings
To optimize Windows privacy settings, use the tool O&O ShutUp10. It allows you to quickly disable many unnecessary telemetry and tracking features.
Here’s the step-by-step guide:
Set Up O&O ShutUp10 and Make It Permanently Available
- Create a directory:
- Create a new folder on your desktop named
oo-software.
- Create a new folder on your desktop named
- Download:
- Download the software from the official website:
- https://www.oo-software.com/en/download/current/ooshutup10
- Move the EXE file:
- Move the file
OOSU10.exeinto theoo-softwarefolder.
- Move the file
- Create a shortcut:
- Right-click
OOSU10.exeand choose “Create shortcut” or “Show more options→Create shortcut” - Rename the shortcut to O&O ShutUp
- Right-click
- Move the folder:
- Move the entire
oo-softwarefolder toC:\Program Files
- Move the entire
- Add to Start Menu:
- Right-click the shortcut OO ShutUp
- Select “Pin to Start”
This way, you can easily launch O&O ShutUp10 from the Start menu and adjust your privacy settings with just a few clicks.
I recommend that after opening O&O ShutUp10, you select “Actions → Apply recommended and limited recommended settings”. After creating a restore point, the settings will be applied.
After activating the settings, the program will prompt you to restart your PC upon exit.
Leave a Reply
You must be logged in to post a comment.