When working with Visual Studio Code DevContainers and using zsh as your default shell, you may encounter an annoying issue: instead of loading the familiar ~/.zshrc and writing history to ~/.zsh_history, VSCode suddenly uses a temporary directory such as /tmp/xyz-code-zsh/.zsh_history. As a result, important shell settings are lost and your history is no longer persistent.
Now that the configuration is complete, it’s a good idea to create a backup of the current system state. The easiest way is via a snapshot in the Server Control Panel.
How to Create a Snapshot:
Go to Media→Snapshots in the Server Control Panel
Enter a short, concise name (letters and numbers only – no special characters or spaces)
Select the option for an offline snapshot – this will shut down Windows to create a consistent backup
Click “Create Snapshot” on the right
Windows will now automatically shut down, the snapshot will be created, and the system will restart automatically afterwards.
In the Server Control Panel, configure the server hardware under Settings: Select your preferred keyboard layout, enable autostart and UEFI mode, and set the operating system optimization to Windows.
By default, Debian Linux is preinstalled on the Netcup vServer.
Using the Netcup Server Control Panel, you can open the remote console from the left-hand menu under _> Screen and log in with your username and password. However, it’s more convenient to connect directly via SSH from your PC – this way, you can easily copy and paste commands.
First, you need to order a server. I use KVM-based root servers from Netcup, but you can choose any provider that offers similar specs.
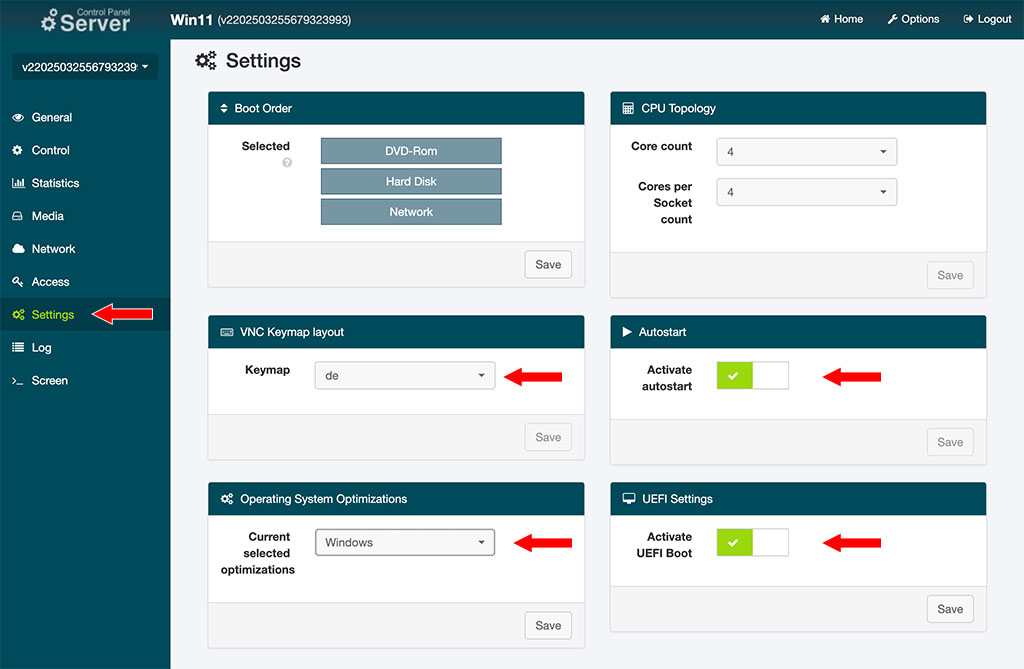
Windows 11 requires UEFI, Secure Boot, and TPM 2.0 – requirements that many virtual servers (VPS, Virtual Private Servers) do not meet. Even on a root server with KVM virtualization (Kernel-based Virtual Machine), TPM and Secure Boot are usually not available, so a registry hack is necessary to enable the installation. Additionally, Windows 11 requires at least 2 CPU cores, 4 GB of RAM, and 64 GB of storage. A KVM-based root server provides the necessary flexibility for ISO booting, stable performance, and full control over resources.
For using a server as a Windows PC, a plan with 4 dedicated cores, 8 GB of DDR5 RAM, and a 256 GB NVMe SSD should be sufficient.
Many users rely on traditional VPN services like NordVPN, Surfshark, or ProtonVPN to bypass geoblocking, network restrictions, or internet censorship. However, these providers are often quickly detected and specifically blocked—by streaming platforms, online services, or restrictive networks. Even when using Tailscale as an alternative VPN, you may run into similar issues.
This article series presents an alternative solution: Install Windows directly on a virtual server (vServer) and access it via Remote Desktop (RDP). The clever part: You won’t just surf “as if using a VPN”—you’ll be browsing on a real Windows PC, which is much harder to detect as a VPN.
The only potential drawback is that the IP address may be recognized as belonging to a data center.
Fail2Ban may sometimes cause issues. In many cases, it’s enough to delete the nftables rules created by Fail2Ban, briefly stop the service, and then restart it. On restart, Fail2Ban will automatically recreate all necessary nftables sets and rules.
I’ll omit sudo in the following examples. It will be required when running nft commands.
Example to delete the f2b-table in the inet family context: