Part 7 of the Series: Windows 11 on Your Root Server: RDP, Tailscale & VPN for a Free Internet
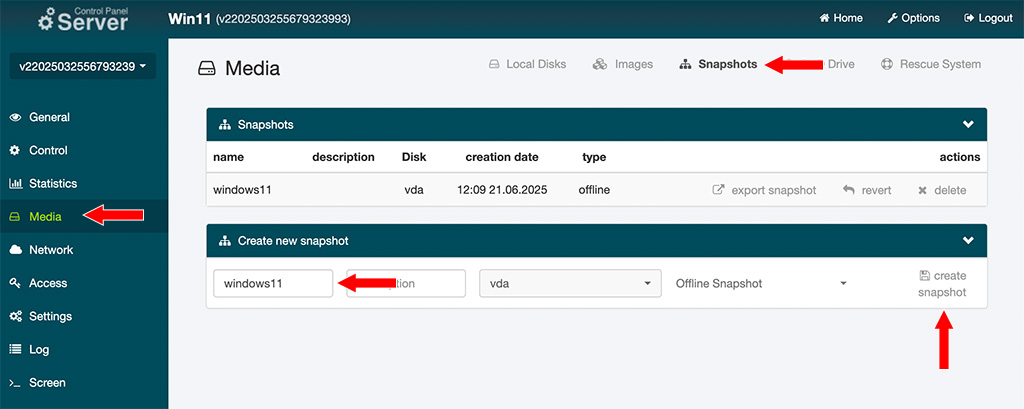
Creating a Snapshot of Our Windows PC
Now that the configuration is complete, it’s a good idea to create a backup of the current system state. The easiest way is via a snapshot in the Server Control Panel.
How to Create a Snapshot:
- Go to Media→Snapshots in the Server Control Panel
- Enter a short, concise name (letters and numbers only – no special characters or spaces)
- Select the option for an offline snapshot – this will shut down Windows to create a consistent backup
- Click “Create Snapshot” on the right
Windows will now automatically shut down, the snapshot will be created, and the system will restart automatically afterwards.
With this snapshot, you can return to the current state at any time – perfect before future changes or software installations.
Changing Scroll Direction and Restoring the Right-Click Menu
- Launch Windows PowerShell and use
cdto switch to your Documents folder. - Create the file configure.ps1 there by running
notepad configure.ps1. - Paste the script content into Notepad.
- Save the script and close Notepad.
- Then run
.\configure.ps1in PowerShell.
The script lets you switch the scroll direction of your mouse or touchpad between “natural” and “classic”, and also set the desired style of the Windows context menu.
# configure.ps1

# Elevate to Administrator if necessary
if (-not ([Security.Principal.WindowsPrincipal] `
          [Security.Principal.WindowsIdentity]::GetCurrent()).IsInRole(
          [Security.Principal.WindowsBuiltInRole]::Administrator))
{
    Start-Process -FilePath 'powershell.exe' -Verb RunAs `
        -ArgumentList '-NoExit','-ExecutionPolicy','Bypass','-File',"`"$PSCommandPath`""
    exit
}

# 1. Scroll direction
$mode = Read-Host 'Mouse scroll direction? (0 = classic, 1 = natural)'

Get-PnpDevice -Class Mouse -PresentOnly -Status OK |
ForEach-Object {
    $deviceId = $_.DeviceID
    $regPath  = "HKLM:\SYSTEM\CurrentControlSet\Enum\$deviceId\Device Parameters"

    Write-Host "`n$($_.Name): $deviceId"

    if (Test-Path $regPath) {
        Set-ItemProperty -Path $regPath -Name FlipFlopWheel -Value $mode -Force
        $current = (Get-ItemProperty -Path $regPath).FlipFlopWheel
        Write-Host "  -> FlipFlopWheel is now $current"
    }
    else {
        Write-Warning "  -> Registry path not found: $regPath"
    }
}

# Context-menu style
$menu = Read-Host 'Classic Windows-10 context menu? (y = yes, n = no)'
$ctx  = 'HKCU:\Software\Classes\CLSID\{86ca1aa0-34aa-4e8b-a509-50c905bae2a2}\InprocServer32'

if ($menu -eq 'y') {
    Write-Host 'Enabling classic context menu ...'
    New-Item -Path $ctx    -Force | Out-Null
    New-ItemProperty -Path $ctx -Name '(default)' -Value '' -Force | Out-Null
}
elseif ($menu -eq 'n') {
    Write-Host 'Keeping Windows-11 context menu ...'
    Remove-Item -Path $ctx -Recurse -Force -ErrorAction SilentlyContinue
}
else {
    Write-Host 'Invalid input – context menu unchanged.'
}

# Finish
Write-Host "`nAll changes have been applied."
Write-Host 'Restart Windows for them to take full effect.'Using Your PC as a Tailscale Exit Node
You can, of course, use your PC as a Tailscale exit node. Here’s how to do it:
- Right-click the Tailscale tray icon.
- Select “Exit Nodes → Run exit node” so that a checkmark appears.
- Open the Tailscale admin console (https://login.tailscale.com/admin/machines) and enable the exit node feature for your device.
- Click the three dots to the right of your PC name and choose “Edit route settings …”.
- In the dialog that appears, check the option “Use as exit node”.
- Save the settings.
- On your local PC, go to the Tailscale settings and select your Windows PC under “Exit Nodes”.
- Verify that it’s working by visiting a site like wieistmeineip.de. It should display the IP address of your remote Windows PC.
Check Power Settings
To ensure your PC doesn’t go into sleep mode and become unreachable, you should make sure that Windows doesn’t automatically put the screen or the system into sleep mode.
The easiest way is by running the following PowerShell commands. Open Windows PowerShell as Administrator and enter the following:
powercfg -h off
powercfg -x -standby-timeout-ac 0Conclusion of the Tutorial
This completes the setup of your Windows server. You now have a secure, optimized system that is accessible via Tailscale, offers RDP access, and is configured to be both functional and privacy-friendly thanks to the customized settings.
This setup is suitable for many use cases — whether as a remote development environment, a hardened browsing PC, a private exit node, or simply a flexible Windows machine in the cloud. Best of luck with your setup!
Leave a Reply
You must be logged in to post a comment.